Viewfinder Preview
Camera framing app for iPhone

Camera framing app for iPhone
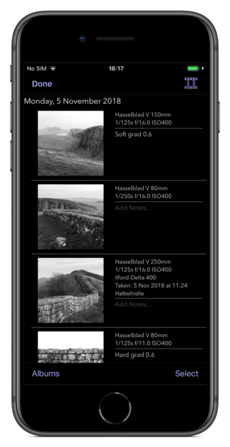
In this post we will discuss some of the aspects of the Journal view. This is an alternative to the standard film strip style Photo Gallery view. The photo gallery is very good for viewing lots of images very quickly. If you want to see the details about a photo or edit the notes attached to it, the view can become quite cumbersome. To solve this we added a new way to view the photos you capture with Viewfinder Preview. This is the Journal view.
To access the Journal view you need to press the book icon in the top right hand corner of the Photo Gallery. Once this is selected the app will remember you are viewing images with the Journal instead of the Photo Gallery. When you choose to view photos it will return to this view instead of the Photo Gallery. If you would prefer to return to the Photo Gallery you can press the film icon in the top right hand corner of the Journal.
The Journal view consists of sections split by date. Each section contains a vertically scrolling list of the images taken on that day. Alongside each image is the information stored with that image: film/sensor format, focal length and light meter values. If you want to view additional information you can tap the details to view the film emulation filter applied, date and time taken and location. The process of adding notes to a photo is considerably simpler. Just tap the “Add Notes…” text and type. Scroll the keyboard, or select something else to get rid of the keyboard once you are finished. If you swipe left on a Journal entry you are given the option to delete the image.
To view an image in more detail tap the photo. This will view the image in fullscreen. You can then pinch zoom and drag to inspect the image. If the image is zoomed out to fit the screen, dragging left and right will move onto the next or previous image and swiping downwards will exit the image view screen.
The journal view also comes along with a feature to group images together into albums. An album can be used to collect all the images from a project, a trip, a location or whatever you like. There are two ways to create an Album. The first one is from the Journal view. Click on the “Select” button in the bottom right hand corner, then select a series of images by tapping on them. There is a little indicator on the right hand side to indicate whether an image is selected. Once you have selected all your images click on the “Add to…” button. This takes you to the Album view. Here you can select an Album to add your images to or select to create a new album. To create a new album press the box with “New Album…” written under it. A dialog will appear asking you to name your Album. Once this has been done you’ll be taken to the Album contents view. This looks very similar to the Journal view except it only shows the images in the currently selected Album.
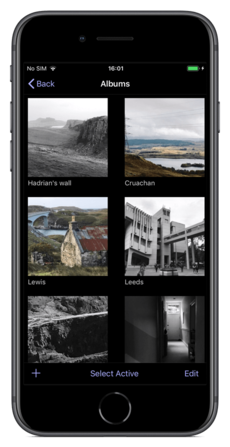
To access the Album view from the Journal view when not adding images to an Album press the “Albums” button in the bottom left hand corner. This view allows you to create new Albums, view the contents of your albums and to edit them. Pressing the + button at the bottom left hand side of the screen, displays a dialog asking you to name your new Album. Once a name is supplied a new empty Album with that name is created. If you press the “Edit” button you go into the album editing state. Tap the red circle at the corner of an Album to delete it. Tap on the Album title to rename it. Press down on an Album for a second and then drag to change their order. To exit edit mode press the “Done” button. The other operation you can do in the Album view is select or de-select the Active Album. All photos you take with Viewfinder Preview are added to the Active Album. Use this on a trip when you know you are going to be taking a large number of images and you want them all placed in a single Album. Just remember to de-activate the Album when you come home.
Click on an entry in the Album view to view its contents. This takes you to a view similar to the Journal except it only shows the contents of the Album you clicked on. Also in this view when you swipe left on an entry you are given the option to remove the image from the Album in addition to the option of deleting it.
The Journal gives you a number of options to share content on social media, or with other applications on your phone. In selection mode in the Journal view you can press the share button to post your selected images on social media, include in a message, add to a note etc.
When viewing the contents of an Album the share button can be used to create a PDF of images in the Album with all their details. You can then send this PDF to someone via email or Message or save it to your phone.